Keycloakを使用する機会があったので、色々と使い方を調査してみました。
Keycloakは管理画面を提供してくれているのですが、今回は管理画面からではなくAdmin REST APIを使用して「レルム」の作成をしてみます。
なお、管理画面の操作方法については公式ドキュメントに記載があります。
Admin REST APIとは
ドキュメントによると、Admin REST APIでは管理コンソールで提供される機能を実行できるREST APIであるとのことです。 実行には適切な権限が必要なようですので、とりあえず今回はkeycloak立ち上げ時に作成しているトップレベルの権限を持ったユーザで実行していこうと思います。
レルムとは
レルムは以下のように公式のドキュメントで説明されています。
レルムは、ユーザー、クレデンシャル、ロール、および、グループのセットを管理します。ユーザーは属しているレルムにログインします。レルムは互いに分離されており、制御するユーザーのみを管理して、認証することができます。
環境
- マシン:Windows11
- Keycloakのバージョン:Keycloak 22.0.0
Keycloakのセットアップ
弊社でもKeycloak関連の記事を執筆していたので、この記事を参考にまずはKeycloak環境を構築していきます。 前回の記事執筆時からKeycloakのバージョン更新による仕様の変更があり、「command: 'start-dev'」を追加しなければならなくなったので注意が必要です。
以下のdocker-composeファイルの例ではデータベースにpostgresqlに変更していますが、データベースの変更の必要はありませんのでデフォルトのデータベースを使用する場合は以前の記事に上記「command」フィールドを追加して起動してください。 データベースの変更はこちらを参考にさせて頂いています。
version: '3.9'
networks:
  auth:
volumes:
  postgresql-data:
    name: postgresql
services:
  keycloak:
    image: quay.io/keycloak/keycloak
    container_name: keycloak
    environment:
      - KEYCLOAK_ADMIN=admin
      - KEYCLOAK_ADMIN_PASSWORD=admin
      - KC_DB=postgres
      - KC_DB_URL=jdbc:postgresql://postgresql:5432/keycloak
      - KC_DB_USERNAME=keycloak
      - KC_DB_PASSWORD=password
    ports:
      - '8080:8080'
    depends_on:
      - postgresql
    networks:
      auth:
    command: 'start-dev'
  postgresql:
    container_name: postgresql
    image: postgres:13-alpine3.14
    environment:
      POSTGRES_USER: keycloak
      POSTGRES_PASSWORD: password
      POSTGRES_DB: keycloak
      POSTGRES_INITDB_ARGS: --encoding=UTF-8
      POSTGRES_HOST_AUTH_METHOD: trust
      TZ: "Asia/Tokyo"
    ports:
      - "65432:5432"
    user: root
    volumes:
      - postgresql-data:/var/lib/postgresql/data
    networks:
      auth:
レルムの作成
レルムはKeycloakの立ち上げ時に自動で作成されるマスターレルムとその他のレルムで役割が違います。 マスターレルムにはdocker-composeファイルで指定した管理アカウントが含まれており、他のレルムの作成や管理を行う場合にのみ使用することを推奨されています。
ここではマスターレルムから、「practice」という名前のレルムをAdmin REST APIを使用して作成していきます。
まずはdocker-composeファイルで指定した管理アカウントの情報を使って、管理ユーザのアクセストークンを取得します。 次にAdmin REST APIを使って、レルム作成のAPIをコールします。
Admin REST APIのURIですが、既定のURIスキームと各項目に記載のパスで構成されています。
例えば、「{base url}/admin/realms/{realm}」のような形で構成されます。(※今回の環境では{base_url}=http://localhost:8080、{realm}=practice)となります。
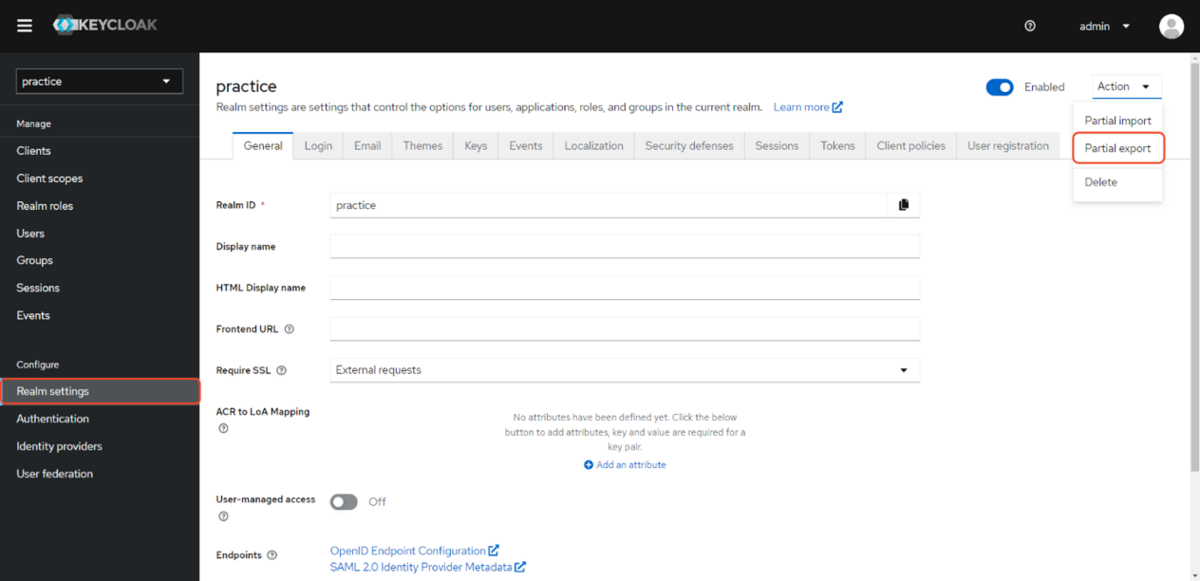
ドキュメントには以下のように記載があり、リクエストボディにはファイルを指定する必要があるようです。 この記載だけではどのようなファイルかよくわかりませんでしたが、色々と調査してみるとレルムの設定が記載されたjson形式のファイルであることがわかりました。 (※既存のレルム管理画面から、メニューの「Realm Settings」から画面右上のプルダウンより「Partial export」を実行してみると、レルムの設定が記載されたjsonファイルがダウンロードできますので恐らくこの形式のファイルを指定すればよいのだと気づきました。)
Import a realm. Imports a realm from a full representation of that realm.
実際はレルム名の指定と有効化設定をすれば、管理画面からレルムを作成するのと同様の設定を各フィールドに補完してくれてそうなので実装はそのようにします。
{"realm": realmName, "enabled" : true}
今回はNode.jsを実行環境にして、javascriptでaxiosを使ってリクエストを実行していきます。
「create_realm.js」というファイルを作成し、axiosをインストールしておきます。
  > npm init
  > npm install axios
axiosをimportするためにpackage.jsonに「 "type": "module"」を追加します。
{
  "name": "practice",
  "type": "module",
  .
  .
  .
}
ファイルには以下のコードを記述します。
import axios from 'axios';


// アクセストークン取得
const requestToken = async () => {
  // ※「http://localhost:8080/realms/master/.well-known/openid-configuration」でエンドポイントを確認できる
  // 参考:https://tex2e.github.io/rfc-translater/html/rfc8414.html
  // トークンエンドポイントを指定
  const url = "http://localhost:8080/realms/master/protocol/openid-connect/token";

  // 管理ユーザの認証情報をセット
  const data = new URLSearchParams({
    client_id: 'admin-cli',
    password: 'admin',
    username: 'admin',
    grant_type: 'password'
  }).toString();

  // ヘッダーにContent-Typeを指定
  const headers = {
    headers : {
      'Content-Type':'application/x-www-form-urlencoded'
    }
  };

  // POSTでリクエストを送信してアクセストークンを取得
  return await axios.post(url, data, headers);
};

// レルムの作成
const createRealm = async (access_token, realmName) => {
  try {
    const url = "http://localhost:8080/admin/realms/";
    const data = JSON.stringify({"realm": realmName, "enabled" : true});

    const headers = {
      headers : {
        'Authorization': `bearer ${access_token}`,
        'Content-Type':'application/json'
      }
    }
    await axios.post(url, data, headers)
    console.log("create success");
  } catch (e) {
    console.log(e.response.data)
  }
}

const exec = async (realmName) => {
  // アクセストークンを取得
  const result = await requestToken();
  const accessToken = result.data.access_token;

  // 指定した名前のレルムを作成
  await createRealm(accessToken, realmName);
}

// 「practice」という名前のレルムの作成処理を実行
exec("practice");
作成したスクリプトを実行します。
> node create_realm.js
無事に作成できたことを管理画面で確認できました。 ついでに作成したレルムの情報をAdmin REST API使用して出力してみました。
import axios from 'axios';
import fs from 'fs';


// アクセストークン取得
const requestToken = async () => {
  // ※「http://localhost:8080/realms/master/.well-known/openid-configuration」でエンドポイントを確認できる
  // 参考:https://tex2e.github.io/rfc-translater/html/rfc8414.html
  // トークンエンドポイントを指定
  const url = "http://localhost:8080/realms/master/protocol/openid-connect/token";

  // 管理ユーザの認証情報をセット
  const data = new URLSearchParams({
    client_id: 'admin-cli',
    password: 'admin',
    username: 'admin',
    grant_type: 'password'
  }).toString();

  // ヘッダーにContent-Typeを指定
  const headers = {
    headers : {
      'Content-Type':'application/x-www-form-urlencoded'
    }
  };

  // POSTでリクエストを送信してアクセストークンを取得
  return await axios.post(url, data, headers);
};

// レルムの情報を出力
const viewRealm = (access_token, target) => {
  try {
    const url = "http://localhost:8080/admin/realms/";
    const headers = {
      headers : {
        'Authorization': `bearer ${access_token}`
      }
    }
    axios.get(url, headers).then(result => {
      result.data.forEach(element => {
        if (target.includes(element.realm)) {
          try {
            fs.writeFileSync(`${element.realm}.txt`, JSON.stringify(element, null, 1));
          } catch (err) {
            console.log(err)
          }
        }
      })
    })
  } catch (e) {
    console.log(e.response.data)
  }
}

const exec = async (realmName) => {
  // アクセストークンを取得
  const result = await requestToken();
  const accessToken = result.data.access_token;

  // 指定した名前のレルムの情報を取得
  await viewRealm(accessToken, realmName);
}

// 「practice」という名前のレルムの情報の出力処理を実行
exec("practice");
{
 "id": "efec4fd9-119a-4c64-acd7-2e1049a5e982",
 "realm": "practice",
 "notBefore": 0,
 "defaultSignatureAlgorithm": "RS256",
 "revokeRefreshToken": false,
 "refreshTokenMaxReuse": 0,
 "accessTokenLifespan": 300,
 "accessTokenLifespanForImplicitFlow": 900,
 "ssoSessionIdleTimeout": 1800,
 "ssoSessionMaxLifespan": 36000,
 "ssoSessionIdleTimeoutRememberMe": 0,
 "ssoSessionMaxLifespanRememberMe": 0,
 "offlineSessionIdleTimeout": 2592000,
 "offlineSessionMaxLifespanEnabled": false,
 "offlineSessionMaxLifespan": 5184000,
 "clientSessionIdleTimeout": 0,
 "clientSessionMaxLifespan": 0,
 "clientOfflineSessionIdleTimeout": 0,
 "clientOfflineSessionMaxLifespan": 0,
 "accessCodeLifespan": 60,
 "accessCodeLifespanUserAction": 300,
 "accessCodeLifespanLogin": 1800,
 "actionTokenGeneratedByAdminLifespan": 43200,
 "actionTokenGeneratedByUserLifespan": 300,
 "oauth2DeviceCodeLifespan": 600,
 "oauth2DevicePollingInterval": 5,
 "enabled": true,
 "sslRequired": "external",
 "registrationAllowed": false,
 "registrationEmailAsUsername": false,
 "rememberMe": false,
 "verifyEmail": false,
 "loginWithEmailAllowed": true,
 "duplicateEmailsAllowed": false,
 "resetPasswordAllowed": false,
 "editUsernameAllowed": false,
 "bruteForceProtected": false,
 "permanentLockout": false,
 "maxFailureWaitSeconds": 900,
 "minimumQuickLoginWaitSeconds": 60,
 "waitIncrementSeconds": 60,
 "quickLoginCheckMilliSeconds": 1000,
 "maxDeltaTimeSeconds": 43200,
 "failureFactor": 30,
 "defaultRole": {
  "id": "87c9c08b-b2aa-4969-a7ca-b798f3199df5",
  "name": "default-roles-practice",
  "description": "${role_default-roles}",
  "composite": true,
  "clientRole": false,
  "containerId": "efec4fd9-119a-4c64-acd7-2e1049a5e982"
 },
 "requiredCredentials": [
  "password"
 ],
 "otpPolicyType": "totp",
 "otpPolicyAlgorithm": "HmacSHA1",
 "otpPolicyInitialCounter": 0,
 "otpPolicyDigits": 6,
 "otpPolicyLookAheadWindow": 1,
 "otpPolicyPeriod": 30,
 "otpPolicyCodeReusable": false,
 "otpSupportedApplications": [
  "totpAppFreeOTPName",
  "totpAppMicrosoftAuthenticatorName",
  "totpAppGoogleName"
 ],
 "webAuthnPolicyRpEntityName": "keycloak",
 "webAuthnPolicySignatureAlgorithms": [
  "ES256"
 ],
 "webAuthnPolicyRpId": "",
 "webAuthnPolicyAttestationConveyancePreference": "not specified",
 "webAuthnPolicyAuthenticatorAttachment": "not specified",
 "webAuthnPolicyRequireResidentKey": "not specified",
 "webAuthnPolicyUserVerificationRequirement": "not specified",
 "webAuthnPolicyCreateTimeout": 0,
 "webAuthnPolicyAvoidSameAuthenticatorRegister": false,
 "webAuthnPolicyAcceptableAaguids": [],
 "webAuthnPolicyPasswordlessRpEntityName": "keycloak",
 "webAuthnPolicyPasswordlessSignatureAlgorithms": [
  "ES256"
 ],
 "webAuthnPolicyPasswordlessRpId": "",
 "webAuthnPolicyPasswordlessAttestationConveyancePreference": "not specified",
 "webAuthnPolicyPasswordlessAuthenticatorAttachment": "not specified",
 "webAuthnPolicyPasswordlessRequireResidentKey": "not specified",
 "webAuthnPolicyPasswordlessUserVerificationRequirement": "not specified",
 "webAuthnPolicyPasswordlessCreateTimeout": 0,
 "webAuthnPolicyPasswordlessAvoidSameAuthenticatorRegister": false,
 "webAuthnPolicyPasswordlessAcceptableAaguids": [],
 "browserSecurityHeaders": {
  "contentSecurityPolicyReportOnly": "",
  "xContentTypeOptions": "nosniff",
  "referrerPolicy": "no-referrer",
  "xRobotsTag": "none",
  "xFrameOptions": "SAMEORIGIN",
  "contentSecurityPolicy": "frame-src 'self'; frame-ancestors 'self'; object-src 'none';",
  "xXSSProtection": "1; mode=block",
  "strictTransportSecurity": "max-age=31536000; includeSubDomains"
 },
 "smtpServer": {},
 "eventsEnabled": false,
 "eventsListeners": [
  "jboss-logging"
 ],
 "enabledEventTypes": [],
 "adminEventsEnabled": false,
 "adminEventsDetailsEnabled": false,
 "identityProviders": [],
 "identityProviderMappers": [],
 "internationalizationEnabled": false,
 "supportedLocales": [],
 "browserFlow": "browser",
 "registrationFlow": "registration",
 "directGrantFlow": "direct grant",
 "resetCredentialsFlow": "reset credentials",
 "clientAuthenticationFlow": "clients",
 "dockerAuthenticationFlow": "docker auth",
 "attributes": {
  "cibaBackchannelTokenDeliveryMode": "poll",
  "cibaExpiresIn": "120",
  "cibaAuthRequestedUserHint": "login_hint",
  "oauth2DeviceCodeLifespan": "600",
  "oauth2DevicePollingInterval": "5",
  "parRequestUriLifespan": "60",
  "cibaInterval": "5",
  "realmReusableOtpCode": "false"
 },
 "userManagedAccessAllowed": false,
 "clientProfiles": {
  "profiles": []
 },
 "clientPolicies": {
  "policies": []
 }
}
レルムを管理する権限とユーザについて
レルムを作成したユーザは、作成したレルムに対するアクセス権限を与えられます。
They will be granted full access to any new realm they create.
今回はトップレベルの権限を持ったadminユーザを使用しましたが、ユーザを新しく作成してそのユーザにレルムの作成をさせるか、対象のレルムに対するアクセス権限を付与することでレルム毎に管理ユーザを分けることができそうです。
まとめ
「Admin REST API」や「admin-cli」を使って自動化していくことを見据えて調査していましたが、特にAPIリファレンスの説明が少なくて苦労しました。
次は、ユーザの作成とロールのマッピングを「Admin REST API」で実行する方法をブログに記載しておこうかと思います。
参考
Keycloak を試してみる - Linkode.TechBlog
How to create a new realm with the Keycloak REST API? – Thomas Suedbroecker's Blog
Keycloakを使ってパスワードログインを導入したので、開発環境について解説してみる - Uzabase for Engineers